Create and Share GIFs with GifLab for iOS

The internet is chock full of animated GIFs from adorable animals to hilarious pratfalls. Now that smartphones are the dominant way to access the internet, it’s no surprise that it’s also become the best way to consume GIFs. Creating them is another matter and can be a chore on a small screen with only touch based controls. Luckily for everyone, the new app GifLab has made creating and sharing GIFs easier and faster than ever before. The GIFs you can create are limited only by your imagination, photography and editing skills.

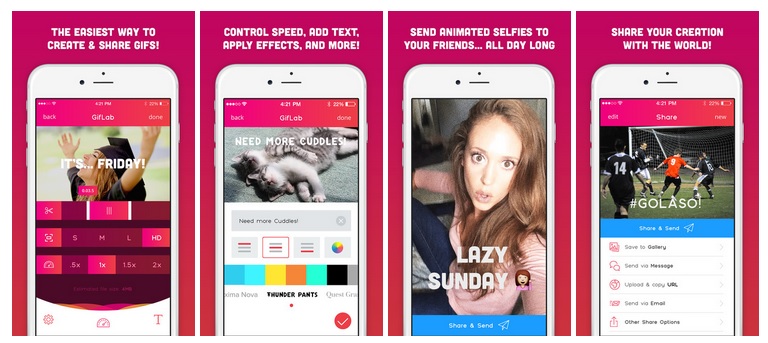
GifLab can make use of any video files stored on your device, whether you took them with your device’s camera or have the file saved locally. Once you choose a video, it’s a simple matter of selecting the part to turn into a GIF. You can adjust the GIF quality as well as the speed. This is great for enhancing a hilarious or epic moment in slow motion or speeding it up to make it even funnier. You can even add emojis and text as well as some basic photography filters to your final GIF. This lets you have even more flexibility and creativity in making a truly great GIF for all to enjoy.

GifLab-screenshots

Once you’re satisfied with the final result, sharing the GIF with the world is a few taps away. You can save it locally to your device, send it as a message or e-mail to friends, upload it via major social networks, or even get a custom URL to share with others. It really couldn’t be much easier and is amazing for getting instant feedback on your new creation.

The GifLab interface is slick, clean and functional and makes creating GIFs easy and intuitive. You can unlock a few more custom features and filters with payments in the app though the basic version is free. Please, get out there and start creating even more adorable cuddly kitten GIFs.

Source: GifLab for Apple iPhone

Ampere – Check Your Battery Charge and Discharge Rate on Your Android Device

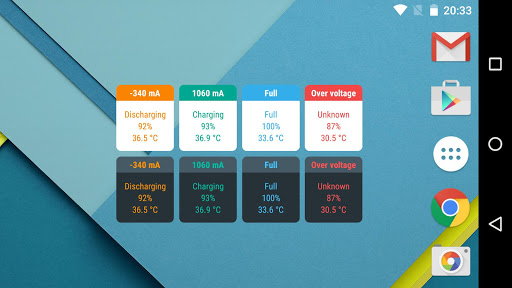
If you’ve ever had a USB cable or outlet that you could swear just didn’t charge your device correctly, you may now be able to prove it with an app called Ampere. Ampere lets you check how many milliamps the device is using from the battery or when it’s plugged into a charger. This is great for checking both battery health and whether or not the charger is functioning and actually charging the battery as it should. Believe it or not, there are faulty chargers out there that get worn with time or just break and will eventually not charge your device adequately if at all.

Ampere runs on Android 4.03 or higher, so if you’re below that unfortunately you cannot run the app. Using Ampere is very simple. You just launch it and it will immediately give the current, low and high draw rates in milliamps as well as a handy list indicating charge status, battery health, battery type and temperature. If you use it when the device is not plugged into anything, you’ll get a direct battery draw status so you can see exactly how much power your device is using at rest. Once you plug it into a charger, you’ll see the indicator (hopefully) change to charging. Ampere will take a moment to measure the average milliamps being drawn and then display it. If you add up the charge being used by the phone on battery power alone and the charge being drawn while plugged in, it should match the specification on your charging unit. If it doesn’t it’s very likely that there is a problem either with the phone’s battery or the charger.

ampere-04

So, if you’re beginning to run into battery problems or simply have a charger that seems to never adequately charge your device, try out Ampere to see if you can confirm the problem. It’s free on Google Play though you can also pay to upgrade to the PRO edition which features alerts and notifications.

Source: Ampere App on Google Play Store

iPhone 7 Release Date, Specs, Rumors

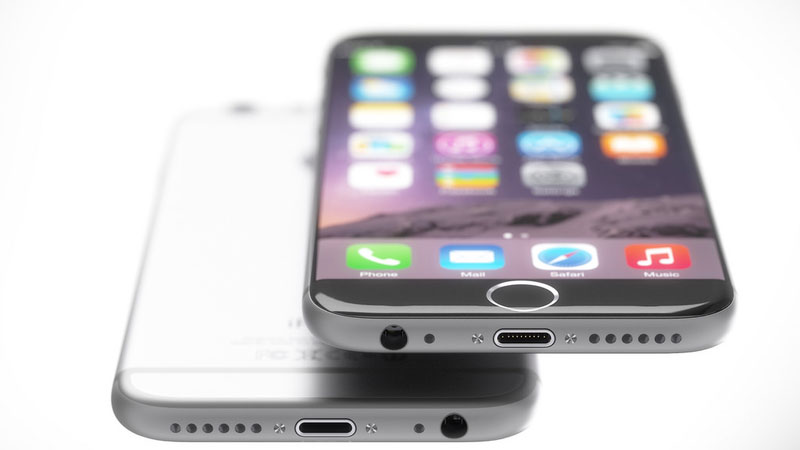
With the flagship iPhone 6 and iPhone 6 Plus having launched in September and the year steadily treading into summer, it is very likely that Apple will be making some announcements soon about the next version of the ever popular iPhone. For now, it’s mostly speculation and rumors but those have been pretty close before, so why not engage in them for some fun? Some features, specifically Force Touch, in the recently released Apple Watch strongly hint that they will make their way to the next iPhone. Also up for debate is whether Apple will choose to call the latest revision the iPhone 6S as it has for every previous model, or jump to calling it the iPhone 7.

iphone-7-concept-4

First, what can be reasonably confirmed is that the next iPhone will feature Force Touch on every model. They already have it in the Apple Watch and it’s a fairly significant feature, so why not include it in the next iPhone? It will also have a faster, upgraded A9 processor and run the new iOS 9. These are all expected to be announced in the next several months in the build up to the actual release. The general design of the iPhone will very likely remain unchanged.

iPhone_6_Plus_review_camera_

Now, for the rumors that are very possible but not yet confirmed, the iPhone might receive a modest camera upgrade to 12-megapixels, feature gesture controls, have a special rose gold edition, and a possible iPhone 6C budget edition. These are much more speculative rumors but are again very possible with the next iPhone. The actual release date is not confirmed either but going by past Apple releases, it’s a good bet that the next version will be actually released in September 2015, about a year after the iPhone 6 release.

If you’ve been waiting to upgrade your iPhone or switch over from another phone, the wait may soon be over. Apple rarely goes a year or more without significant updates so expect some interesting news about iOS 9 and the next iPhone over the summer.

how to best Download and Install Android M for Nexus 5, 6, 9

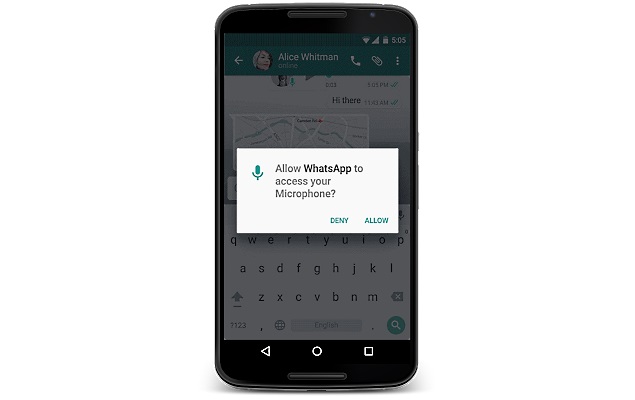
The latest version of Android, dubbed Android M, has been released in a developer preview version alongside Google’s I/O conference. It will prepare Android to better integrate wearables and Google’s Material Design aesthetic philosophy. It is now available for download and testing on Nexus 5, Nexus 6, Nexus 9, and Nexus Player. Though this is an early preview version, it is the full Android M and can be downloaded and installed by anyone with one of these four Nexus models. The preview version is meant for developers to test their apps and associated devices using the new Android M and is of course expected to have some unintended bugs crop up. That’s exactly the point of having a preview version so developers can find and fix these bugs as well as make general improvements before the full official release to the public.

To install Android M on your Nexus, you’ll need to download the appropriate image file.

Then, follow the directions at https://developers.google.com/android/nexus/images to flash the image onto your device.

Be aware that this will overwrite your current version of Android and that this is a developer preview version that can and will have bugs. It’s recommended to wait for the official full release unless you’re a budding developer or just want to tinker around with the very latest Android release. One helpful thing to note is that Google has said that these previews will receive frequent updates as developers make small fixes and improvements. So once you’ve installed Android M, updates should be automatically downloaded and applied and you won’t have to reinstall it every time.

android_app_permissions_io_2015 now_on_tap_google_io2015

So if you really just can’t wait to try out the next version of Android and you happen to own a Nexus device, you’re free to give Android M a try. Maybe you’ve had enough of those sweets like Jelly Bean and KitKat and just want some M.

Select and Remove Any Color From Image And Add Transparency

If you’ve ever tried editing an image, you know that it can be valuable to selectively remove a large portion of it or a single color. Photoshop and many image editing suites come with tools like the magic wand and lasso that will do their best to select part of an image for removal. Sometimes though, it can be faster and easier to simply remove all of a certain color  to get to the part of the image you really need to edit. This is obviously most useful in an image with large areas of a single color.

There is a Freeware program for Windows called Transparent Image Converter that can accomplish just this task. After downloading and installing the program, follow these simple steps to remove all areas of a particular color from an image. You can even go over the image several times if areas of slightly different color remain and you’d like to clean it further.

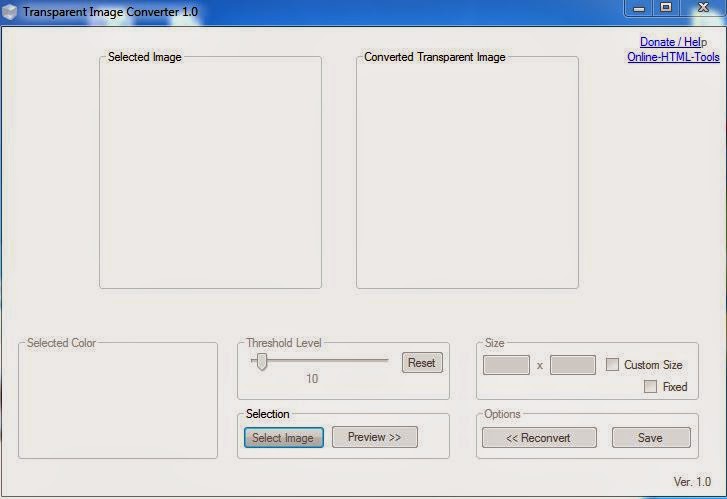
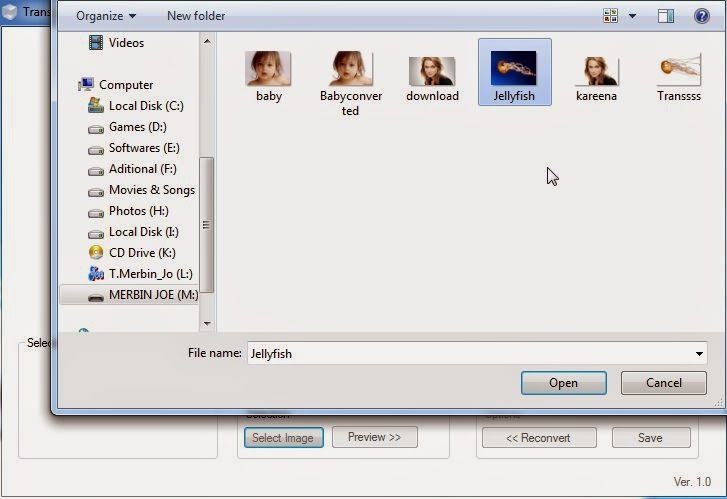
1. Click Select Image. Browse for the image you want to edit and select it.

frm00001

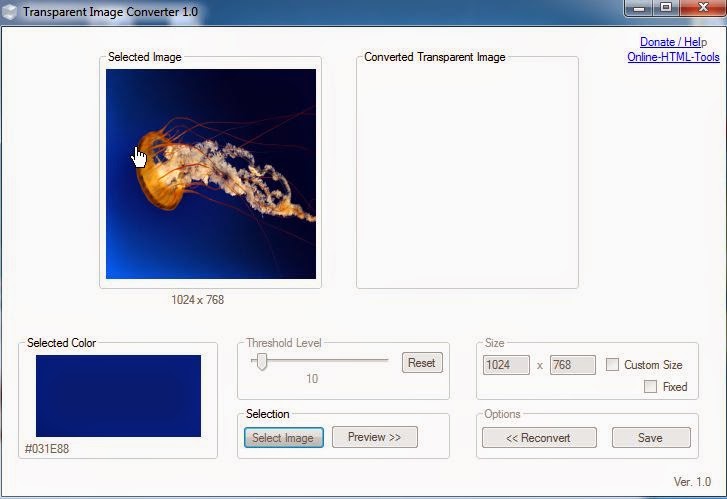
2. In the image viewing pane, mouse over the image and find the area with the color you want to remove. A color preview box below shows the color the mouse is currently on. Click the image once the mouse is over the right color.

frm00002

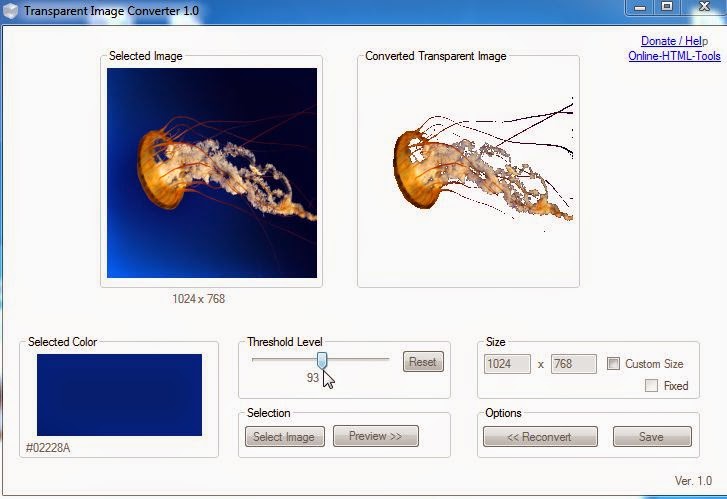
3. Select a Threshold level and click Preview to see the results of removing the color. You can adjust the Threshold to get varying levels of removal.

frm00003

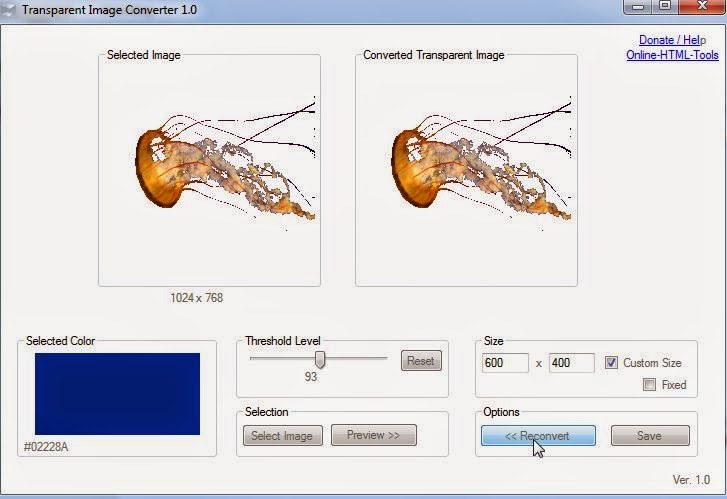
4. If you want to remove more color, click Reconvert under Options and the image can be edited again.

frm00004

5. You can also resize the edited image by entering the new dimensions in the Size area.

frm00001_2

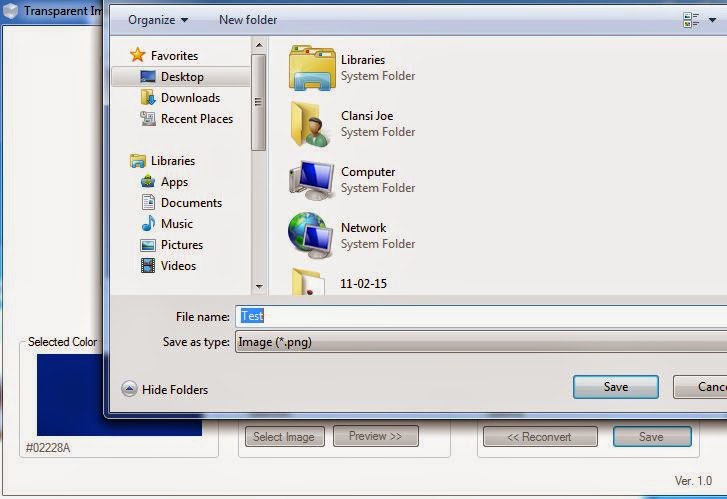
6. When you’re satisfied with the final result, click Save.

frm00006

Now you should have a much cleaned up image that’s free of the colors you don’t want. It’s a very handy editing tool for a specific and useful task.

Source: Transparent Image Converter 1.0

Disable Facebook Messenger Location Sharing on Android and iOS

If you’ve been happily using Facebook’s Messenger app without knowing that it was constantly tracking your location and making it available to nearly everyone, take note. Facebook Messenger does track and upload your location data by default so as long as you’ve had this feature enabled, anywhere that you’ve been can be easily viewed on a map for any date and time that the data was uploaded. This is obviously a major privacy concern for some who wouldn’t want their every habit detailed. Luckily there is a way to disable location logging from the Messenger app. Just follow these steps to stop the app from constantly uploading your location.

For Android devices:

1. Open the Messenger app on your device.

2. Tap the Settings tab.

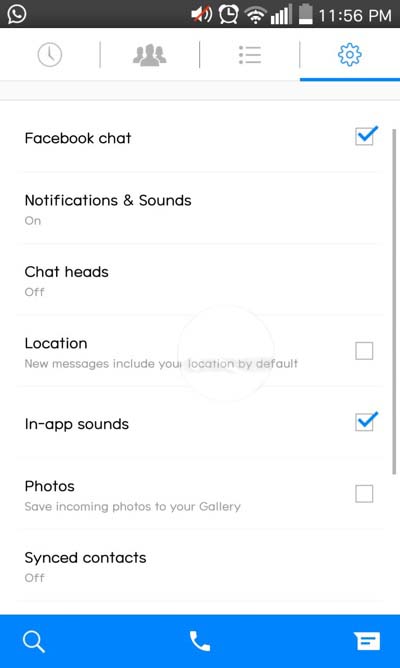
3. Under Settings, tap the box next to Location so that it’s blank. This will disable location logging by default.

Android-location

For iOS devices:

1. Open the Settings app.

2. Go to Privacy then Location Services.

IMG_1382

3. Now you should find a list of apps that use location data. Find the Messenger app in the list.

IMG_1378

4. To the right of the Messenger listing, change the setting to Never.

IMG_1379

Once the location logging has been disabled, Messenger shouldn’t upload that data with your posts. Of course if you like and use this feature and want to be able to instantly track where you posted something from, you can just reverse those settings to enable it again. Location data does have its uses if you want people to easily map where you posted from or you’re doing some sort of project where it’s necessary. You might also like to go back and review your own posts and quickly see where they were made from for memory’s sake. For most however, it’s probably a good idea to disable it just for security and privacy reasons.