Get Apple Watch Style Notifications on Your iPhone Lock Screen

If you’re the owner of an Apple Watch and have gotten used to the style of notifications, you might be pleased to hear that you can achieve a very similar effect on the iPhone now. With WatchNotifications, a tweak available on Cydia in the BigBoss repository, you can change your iPhone lock screen notifications to be nearly identical to those on the Apple Watch. To access Cydia, you’ll need to have jailbroken your iPhone which is thankfully available on the current firmware.

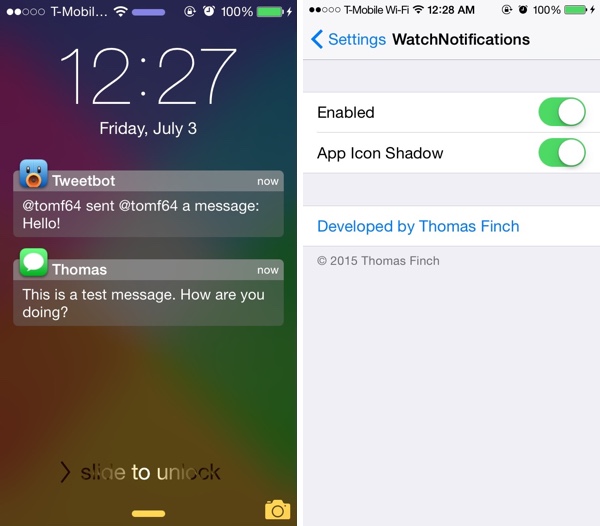
The notifications feature large bubble icons that alert you to the specific app the notification is from as well as a slick box with the actual information as well as the time it was received. If you prefer to have your interfaces the same across many devices, this is an easy way to unify the look on both the Apple Watch and your iPhone. WatchNotifications is not free but only costs $1.00 on the Cydia store.

Once you’ve downloaded the tweak and paid to unlock it, you can easily toggle the effect on or off from the standard Settings app. You can also disable the shadow beneath the app icon if you prefer that. That’s all there is in the way of customization but everything works well and as intended so there’s really not much need to change anything.

112

If you’re just fine with the way notifications look on your iPhone then there’s not much here for you. For others though, little changes in the look and feel of things can make a big difference and for only a dollar, it could be well worth it if you just can’t stand the minor difference from Apple Watch notifications. It’s at least nice to be given the option and opportunity to change the look via jailbreak tweaks which offer a flexibility of choice that Apple rarely does.

Hide OneDrive Photos From Appearing In Windows 10 Photos

Microsoft’s OneDrive cloud storage is enabled by default in Windows 10. It automatically uploads your videos and photos to the cloud and all content is also viewable through the Photos app in Windows 10. While for some, this might be a wonderful and convenient feature, others might have some privacy concerns with having all of their photos and videos readily available through the Windows 10 Photos app. It is extremely easy to disable this feature however, so if you have any concerns, just follow these steps to hide photos and videos.

1. Launch the Photos app in Windows 10.

windows-10-settings

2. Click the menu button on the top left (three horizontal lines). Then click ‘Settings‘ on the bottom left next to the gear icon.

windows-10-photos-settings-turn-off

3. Under ‘Sources‘, you’ll see an entry called ‘Show my photos and videos from OneDrive‘. There is a toggle switch below which is ‘On‘ be default. Switch it to ‘Off‘ to disable showing photos and videos in the Photos app.

Now when you use the Photos app, your OneDrive videos and photos will not automatically show up. This does not affect your uploading files to OneDrive or downloading them back, it simply stops them from being viewable by default in the Photos app. If you prefer that they do appear, simply go back to the toggle switch and put it back to ‘On‘.

Thankfully Microsoft has included this feature in the Photos app and will not force all users to allow their photos and videos to be fully viewable in the app. It’s always nice to be given the option whether you choose to use it or not. When the final release of Windows 10 finally rolls around, it’s likely that there will be even more flexibility, features, and control with both OneDrive and the Photos app. For now, this is a simple workaround that should keep most users happy.

The 5 Best Online PDF to Microsoft Word Converters

It’s simple enough to convert a Word document to a PDF file, but it can be a little trickier to convert any PDF into a suitable Word file. If you have some PDF files that you’d like to convert into Word format, there are options that include dedicated desktop apps and also online converters. Converting a PDF to Word format makes it much easier to edit and the resulting file can be stored either as a Word document or converted back to a PDF for great flexibility. Give these 5 online converters a try if you have some PDFs lying around that need converting.

1. Smallpdf

Smallpdf

This useful online tool lets you instantly drag and drop PDF files which are then converted to the DOCX format for use with Microsoft Word. You can also select the PDF from a dialogue and there are even options for merging PDFs. Once the conversion is done, you can download the resulting file or have it uploaded to Google Drive or Dropbox.

2. Go4Convert

Go4Convert

Another great online conversion tool, Go4Convert lets you easily switch between PDF and Word documents with no quality loss. You simply browse to the file you want to convert, select it, and wait while the conversion takes place and you can save the resulting file. Go4Convert also offers other conversion options like PDF to TXT, RTF, etc.

3. CloudConvert

cloudconvert

CloudConvert is great if you have a batch of PDFs that need to be converted all at once with less hassle. It can convert an entire folder’s worth of PDFs from cloud storage like Dropbox, from your computer itself, or from a URL. Highly recommended if you need to convert multiple files at once.

4. Free PDF to Word Online

free-pdftoword

For a solid conversion choice, Free PDF to Word Online handled converting PDFs quite well. It does however have a limit of 10MB for the PDF file and is a bit slower than some other converters. Still, it can convert to multiple formats and performs nicely.

5. Docs Zone

docsZone

The best thing about Docs Zone is ‘Exact’ mode that uses OCR to produce the best possible conversion from PDF to Word DOCX. The words in the original PDF are scanned and converted so the DOCX file is fully editable. As with some of the other converters, you can also do batch jobs with multiple PDF files at once. The one major drawback is that the resulting files Docs Zone outputs are quite large which can be more trouble than it’s worth.

5 Great Social Android Wear Apps

As the use of smartwatches grows, more and more Android apps are being updated to play nice with Android Wear if not written for the wearable platform from scratch. As you’re likely to be wearing a smartwatch while out on the town, it can be a great addition to your social networking. Instead of blatantly whipping out a smartphone to check on Facebook or your texts, you can slyly tap your smartwatch to get much of the same information with less hassle. Here are 5 apps designed with Android Wear in mind. Be sure to give them a try if you’re looking for social applications for your smartwatch.

1. Swarm by Foursquare

swarm

With Swarm, you can easily check on your friends’ activities or share your own in the hope that someone will want to join. It’s a fun way to meet up with existing friends or even find new ones nearby who share common interests. You can choose to message people individually or as a group and get an activity going.

2. Skout

skoutpng

It’s easy to make new friends and chat with people on Skout. You can send chat messages, emojis, voice messages. and photos with other Skout users. The app makes it easy both to find nearby people to chat with as well as hop around the globe and find someone halfway around the world to share messages with.

3. VK

ck

If you’re fed up with Facebook for some reason or just want to try an alternative, VK might be for you. VK is a full-fledged social network with many of the same features as Facebook. Update and share your own status, check on friends and family, it’s all possible on VK from your smartwatch.

4. Banjo

banjo

For fans of live news and events, Banjo is a great app. From concerts and sporting events to conferences and expos, Banjo collects posts and information so it’s easily viewable and shareable. It’s a great way to feel like you’re at the event or at least get a good idea of what’s going on. If you’re close enough, you can even try to make it there in person if you like what you see.

5.Vingle. Very Community.

vingle

Vingle brands itself as a place for thousands of communities, from the very popular and large, to the obscure. If you ever wanted a place to share and discuss interests with like-minded people online, Vingle could be for you. It’s easy to share tips, tricks, techniques, knowledge and the pure enjoyment of your community with others. If you’re an expert, share your expertise with others and if you just want to learn, soak up all the information on offer.

Use Internet Download Manager (IDM) With Vivaldi Browser

Vivaldi is a new browser from one of the founders of the popular Opera browser. Vivaldi was created in response to changes in Opera that were not particularly welcomed by some users. It’s still in a preview version but can be expected to grow steadily, especially with those who were fond of the Opera browser. If you’ve been looking for an alternative browser or are just a fan of trying out new and competing software, Vivaldi is worth a look.

Internet Download Manager or IDM is a popular download management extension with some advanced features beyond those offered by most browsers such as scheduled, and faster downloads. If you’ve also become a fan of IDM and were hoping it would be usable with the new Vivaldi browser, you’re in luck. With a few steps, IDM works perfectly with Vivaldi so you can get back to downloading to your heart’s content. Follow this procedure to integrate IDM with Vivaldi.

1. Download and install the latest versions of both IDM and the Vivaldi browser.

2. Click the IDM tray icon to open it.

3. Go to ‘Downloads‘, then ‘Options‘.

integrating-Vivaldi-browser-into-Vivaldi

4. Under ‘General‘, check ‘Advanced Browser Integration‘.

5. Click ‘Add Browser‘.

6. Click ‘OK‘ and navigate to the ‘vivaldi.exe‘ file. (In Windows the vivaldi.exe is located at

locate-the-browser-dialog

C:\Users\username\AppData\Local\Vivaldi\Application\vivaldi.exe).

7. Now Vivaldi should appear under ‘General‘ as a supported browser.

8. Restart Vivaldi, attempt a download and it should be handled by IDM.

9. Also make sure to enable IDM by going to vivaldi://chrome/extensions.

That’s it. It’s a pretty straightforward process and it’s nice to know how easily IDM can be integrated with Vivaldi. Perhaps in future releases this process won’t be necessary if Vivaldi increases in popularity and has a larger user base. For now, this is a fast and easy way to enjoy the download benefits that IDM has to offer while also experimenting with the new Vivaldi browser.


(Credit: Venkat eswarlu – Techdows.com)

Disable Automatic Renewal In Apple Music, Here’s How

Apple’s new streaming music service, Apple Music, has just launched and with it comes a free three month trial. With Apple Music, you gain access to many music stations, a huge catalog of streaming music, and any track you’ve purchased on iTunes can also be streamed directly to your device. You’ll be able to skip ads and songs as well as access premium stations and music videos. Apple Music also hopes to act as a digital curator of new music content and more interaction from artists.

Of course there is a catch and after those three months are up, the service is set on automatic renewal, meaning you will be charged on a monthly basis. The service costs $9.99/month for an individual user and $14.99/month for a family plan. Luckily the process for disabling the automatic renewal is very easy and can be performed from either your Apple device or iTunes.


iOS Device (iPod Touch, iPad, iPhone)

1. Launch the Music app.

IMG_0055

2. Tap your account icon in the top left.

IMG_0056

3. Tap ‘View Apple ID‘.

IMG_0057

4. Under ‘Subscriptions‘, tap ‘Manage‘.

IMG_0058

5. Find an entry called ‘Your Membership (Apple Music Membership)‘ and tap it.

IMG_0061

6. At the bottom you should see ‘Automatic Renewal‘. Tap the toggle switch and then ‘Turn Off‘ to confirm that you want to disable automatic renewal for Apple Music.


iTunes

1. Launch iTunes and tap your account icon in the top right.

Screen-Shot-2015-07-02-at-6.00.29-AM1

2. Click ‘Account Info‘.

Screen-Shot-2015-07-02-at-6.01.06-AM

3. Under ‘Settings‘, find ‘Subscriptions‘ and click ‘Manage‘ on the right.

Screen-Shot-2015-07-02-at-6.01.20-AM

4. Find ‘Your Membership (Apple Music Membership)‘ and click ‘Edit‘ on the right.

5. Change ‘Automatic Renewal‘ to ‘Off‘.

With these steps, automatic renewal will be disabled and you can enjoy your three month trial without fear of being charged for the fourth month and beyond. Also note that if you disable automatic renewal either on a device or through iTunes, it will be disabled automatically on both at once and will remain disabled unless you turn it back on. If you really enjoy the Apple Music service and want to continue using it, simply follow the same steps to enable automatic renewal again.