Restore Deleted Data Files, Contacts and Calendars From iCloud

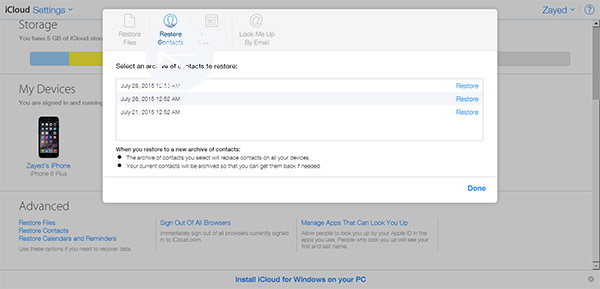
Apple’s iCloud is a marvelous feature for protecting and restoring your data. These include everything from regular files to contacts, calendars, and reminders and all of them can be both uploaded to Apple’s cloud and pulled back down in the event that they’re lost or deleted. With recent updates to iCloud, restoring data for each category is just a few clicks away under new options to ‘Restore Files’, ‘Restore Contacts’, and ‘Restore Calendars and Reminders’. You simply login with your account at iCloud.com, then click on your account and iCloud Settings where you can access the restore options.

iCloud-2

iCloud-3

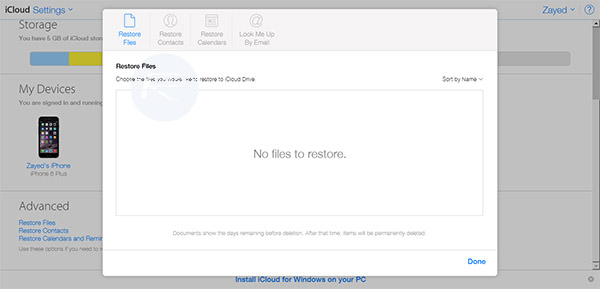
With ‘Restore Files’ selected, you’ll be given a list of files that have been recently deleted from iCloud storage. Luckily these are still stored for a period of time and you can recover them if they were deleted accidentally or you decide you want them back. This option will notify you of how much time is remaining before the files are permanently removed and no longer recoverable. This is a great feature for those that worry about accidentally deleting files in the cloud and also for an extra layer of protection for your data.

iClould-Advanced

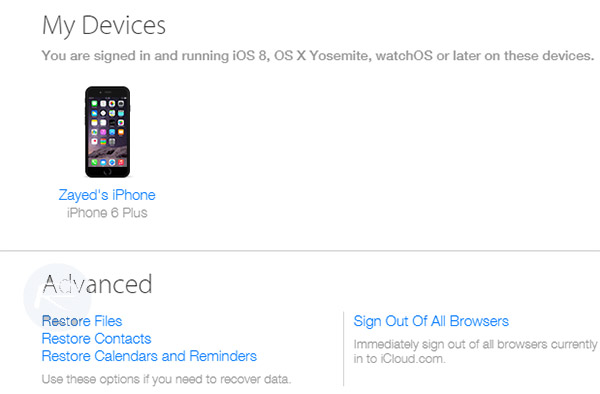
The restore options for both Contacts and Calendars & Reminders are a little bit different. If restored, these can potentially overwrite your existing Contacts or Calendars and Reminders which could obviously prove to be troublesome and interfere with your current data. You will also need to reshare this data if it was shared previously, scheduled events will be cancelled and rescheduled, and invitations will be reissued. This could also be a headache if you have many appointments or invitations and they all get sent out again or need to be manually reshared. Just be extra careful when managing restoration of these kinds of data and be aware that they could conflict with or overwrite your current Contacts, Calendars and Reminders.

Customize Windows 10 Themes and Colors

Going from Windows 7/8/8.1 to Windows 10 is a mostly painless experience and many are enjoying some of the new features present. You might have noticed immediately that much of the styling in actual windows is very bright and tends toward the lighter part of the spectrum. Opening a new Office document or File Explorer window can be a little jarring at first because of how bright and white the interface is. It’s more noticeable too with the absence of Aero and tinted upper portions of windows. If you find that these interface shifts are a little hard on your eyes, you can often adjust them to either be less bright or use an actual dark or gray theme to have the entire look shifted to darker colors. Here are a few common areas where the themes and colors can be adjusted and how to accomplish that.

1. Office 365

office-2 office-3 office-4

Inside Microsoft’s new Office 365, you can change the look by adjusting the ‘Office Theme’. Just click File, Account, then under Office Theme, you can select Light Gray or Dark Gray. Light Gray is still very bright and hardly makes a difference while Dark Gray does make the window a bit softer on the eyes by darkening most of the view.

2. Start Menu and Taskbar

taskbar-2 taskbar-3 taskbar-4 taskbar-5

Windows 10 and Windows 8 before it are pretty fond of that bright traffic light green as well as inky black. If you want to adjust these, it’s a simple matter of clicking the Windows button, Settings, Personalization, and then Colors. Disable ‘Automatically pick an accent color from my background’ and then select the darkest gray box for your new color. Also disable the next two entries so that the Start Menu icons and taskbar will also take on the dark gray color.

3. Edge Browser

edge-1 edge-2 edge-3

If you’ve become a fan of Microsoft’s new flagship browser, luckily it has a built in dark theme. Just click the three dots at the top right, then Settings, and under ‘Choose a theme’ select ‘Dark’ to have the entire interface changed to a much darker theme.

4. High-Contrast Mode

high-contrast-1 high-contrast-2 high-contrast-3

You can achieve something very similar to the Dark theme in Edge with High-Contrast modes in Windows 10. Click the Windows button, Settings, then Personalization, Themes, and finally Theme Settings. Then you can select from a few different High-Contrast modes which can turn the background entirely black with text and icons in white.

Give these settings a try if you want a darker theme in Windows 10. It’s great for use on a tablet or other mobile device at night or if you just prefer dark themes overall.

Install Windows 10 On a Mac With Boot Camp

The bygone days of petty fighting between Mac and Windows are mostly gone and Macs now play nice with having Windows installed. If you’re a Mac user feeling slightly envious of all the buzz around the new Windows 10, you might be surprised to know that you can have the best of both worlds. It is relatively easy to install Windows 10 on your existing Mac and dual boot into either OS. It’s definitely a major convenience to be able to run both Windows and Mac regardless of what the diehard fans of each camp say. Follow these steps to get that shiny new Windows 10 OS on your Mac.

Before you begin you will need the following:

  • A Mac running the latest version of OS X and at least 2GB of RAM.
  • 30GB of space on your Mac’s hard drive.
  • Windows 10 Product Key (Windows 7/8/8.1 keys will not work)
  • A flash drive with at least 16GB of space for the Windows 10 files
  • Windows 10 ISO

Screen-Shot-2015-07-30-at-9.15.59-AM

1. Search for and launch Boot Camp Assistant.

2. In the ‘Select Tasks’ Window, check both options and click ‘Continue’.

Screen-Shot-2015-07-30-at-9.18.12-AM

Screen-Shot-2015-07-30-at-9.17.49-AM

3. Connect your USB flash drive and then browse for your Windows 10 ISO file and click ‘Continue’.

Screen-Shot-2015-07-30-at-9.18.03-AM

4. You will be told that the USB flash device will be formatted, click ‘Continue’ to begin writing files to it.

Screen-Shot-2015-07-30-at-9.47.27-AM

5. Boot Camp will now begin copying drivers and files to your USB device. This could take a little while as downloads are included.

Screen-Shot-2015-07-30-at-10.00.45-AM

6. Once complete, you will be asked to create a partition for Windows 10. Make it at least 30GB and click ‘Install’.

Photo-06-04-2013-8-20-48-PM

7. Your Mac will restart and will boot into the Windows 10 setup. Follow the instructions on the screen, enter your Windows 10 key when prompted, and choose the 30GB partition when asked where you want to install Windows 10.

8. After installation, it will boot into Windows 10. You need to install your Mac’s drivers to have all devices work in Windows 10. Find ‘setup.exe’ in your USB device and run it to install all drivers.

Win10setup

9. Once installed, reboot once more and everything should be working and you’ll have a nice new Windows 10 setup.

10. If you want to boot between Windows 10 and OS X, hold down the option/alt key when you hear the Mac chime and you can select which OS to boot into.

5 Amazing Screen Recording Apps For Android Lollipop

Recording your smartphone or tablet’s screen is great for creating video tutorials, reviews, gameplays, and sharing how you use your device with others. There are a lot of apps out there with varying sets of features. Most will at least let you record video from your device’s screen but many do not also include audio from the app that is running. This can be a major drawback if you want to create certain types of video for something like a review or gameplay where it would be nice to have some of the app sound included. If you’re searching for a way to conveniently capture video from your device screen, check out these 5 highly recommended screen recording apps.

1. Screen Recorder

Screen-Recorder

While it might not have the most imaginitive name, Screen Recorder does provide solid and reliable screen recording. The free version offers unlimited screen capture but with no audio and the app does not automatically minimize itself when recording begins. The Pro version does include app audio and auto minimizing as well as the ability to include your own banner.

2. One Shot Screen Recorder

One-Shot-Screen-Recorder

This app is great for those who want to do some basic editing of their captured video, all from within the app itself. You can capture video and do some basic cuts, edits, time-lapse, etc. in the app and then save it or upload it elsewhere. You can pay to remove ads, remove the watermark, and include your own banner.

3. Rec.

Rec.

Rec. lets you record up to 5 minutes of HD device capture without app audio. If you get the Pro upgrade, you can record up to an hour with both app audio and mic audio if you want to narrate or comment on your video. Rec. features a lot of customization for video quality as well.

4. AZ Screen Recorder

AZ-Screen-Recorder

This is currently the most highly rated screen recording app for Android and for good reason. It lets you record full device video and app audio for an unlimited length of time with the free version. Even better, there are no ads and no watermarks on the final video you produce. If you want additional features like dual recording yourself with the front camera and drawing on the screen during recording, you can upgrade to the paid version.

5. Unlimited Screen Recorder

Unlimited-Screen-Recorder

Unlimited Screen Recorder allows you to record your device’s screen for any length of time without ads or watermarks. You can adjust the video’s bitrate to increase or decrease the video quality as well. The main drawback is that there is no app audio option and there is no upgrade so you’ll have to do with video only. You can record your own voiceover with the device’s microphone however. The app also doesn’t like changing orientation and will crash if it is changed during recording.

Search Any Object With CamFind And Your Smartphone’s Camera

CamFind is a new app that can perform a detailed image search based on any photo you provide. You simply snap a photo of the object you want to search for and CamFind will identify it and provide internet search results relating to the object or objects as well. Image recognition has come a long way in recent years and can reliably identify more and more complex objects quickly and accurately.

camfind1

After launching the CamFind app, you just point it at whatever object you want to learn more about, take a quick photo, and let CamFind perform its image search. You’d be surprised to see how fast and accurate it is. If there is any text visible on the object, it provides even more clues and accuracy to the image search but it also performs with impressive precision even without any text cues. The extra internet search is quite useful as well and saves an additional step as well as providing a wealth of related information all at a glance. The internet results are also highly relevant to go along with the object being identified. Even better, these results can be used within the app to do price comparison shopping, identify unknown or interesting products and places, search for similar objects and products, and instantly share your findings via social networks.

CamFind also includes other helpful search functions like a QR code reader, voice and text searches, and language translation. This is great if you don’t want to jump from app to app and can rely mostly on CamFind for your digital and smartphone assisted search needs. CamFind also saves a list of its searches so you can remember what you’ve searched for and identified. It’s great for jogging your memory or keeping tabs on interesting new finds.

camfind13

CamFind definitely showcases the increasing power of digital image searches. Not only is it startling fast and accurate, it’s useful and provides some fun and unique ways to search for things visually.


-> Source: CamFind App for Android | Apple iPhone

Disable Recent Files And Folders In Quick Access In Windows 10

Many programs keep something of a running tab on associated files and folders. Things like recently played tracks in a music apps, recently viewed videos on a media player, and the like are often tracked for easy repeated access. For some, this is a great convenience and saves much time when trying to find commonly accessed media. Of course for others this can also become a privacy headache if you share your computer or have accessed some media which you wouldn’t want others to know about.

By default, Windows 10 has a feature called Quick Access that keeps your recently accessed files and folders in one place. In this “folder” you can view what was viewed or used most recently and is an easy way to quickly find files that you’ve been working on. For others who have privacy concerns and want to disable this feature, thankfully it is rather easy to accomplish.

1. Click the Windows button to open the Start menu and then click ‘File Explorer’.

File-Explorer-Options

2. Now click ‘View’ on the top and then ‘Options’ all the way to the right.

win10-Folder-Options

3. Under Privacy, uncheck the boxes next to ‘Show recently used files in Quick Access’ and ‘Show recently used folders in Quick Access’. Then click ‘Apply’. This will stop Quick Access from keeping track of all recently accessed files and folders.

4. You can also click the ‘Clear’ button to remove all current entries in Quick Access and clear the File Explorer history.

5. If you like to use Quick Access but only want it to temporarily show your files and folders, you can hit the ‘Clear’ button and keep the other boxes checked. Then it will continue to track recently accessed media but the list can be cleared manually.

You can think of it much like clearing your browser so keep that in mind when deciding whether to use Quick Access or not.