Try Out Some Of Android 6.0 Marshmallow’s New Features Early

The latest version of Android has been known by the code name Android M for some time now. Well, Google has revealed that the M will now stand for Marshmallow, as in Android 6.0 Marshmallow. This is in keeping with their tradition of naming each new version after some kind of sweet. For now, only Nexus phones and developers have access to the latest revisions of Android Marshmallow, but that doesn’t stop other users from experiencing a taste of it. Though you’ll have to wait for the official release if you don’t have one of those devices, it is possible to use Marshmallow’s wallpapers, launcher, and even use its boot animation on nearly any other updated Android device.

The new Google Now Launcher is one of the easiest things to download and try out and will give you a bit of an idea of what to expect from Marshmallow in terms of interfaces and changes. You simply need to download the apk file, enable installation from Unknown Sources, and then install the apk. Then you’ll be able to use all of the new features present in the Google Now Launcher.

google-now-launcher

The default Marshmallow wallpapers are also now widely available for download online. A simple search should reveal nine great looking new wallpaper to try out on your device. It’s nothing revolutionary but it can be fun to try out Google’s offerings to spice up your device background.

Finally, you can also alter your device’s boot animation to use the new Marshmallow one. If you have the Cyanogen Theme Engine, it’s as easy as downloading the new boot animation apk file and then setting it as your theme. Then, whenever your device boots you’ll see Marshmallow’s new playful, colorful animation which is very well done indeed. Other users can flash the animation to their device from recovery mode.

Android Marshmallow should be arriving in a few months but until then, if you can’t wait this is a great way to get some of that Marshmallow flavor early.

Use The Classic Photo Viewer In Windows 10

The upgrade to Windows 10 has gone smoothly for millions of users and it’s just as surprising to see how much Microsoft has left alone compared to how much has changed. While certain apps and features were removed for the sake of modernity and change for the better in Windows 10, quite a few features are actually still there and just in hiding. It might take a few extra steps to enable these features again, but for fans of the classics it’s well worth it.

One notable change is when it comes to opening and viewing photos. When you open a photo in Windows 10, everything is now handled by the new Windows 10 Photos app. For the most part the functionality is the same, but there are some differences. The new Photos app is perhaps sleeker and has more features, but it forces you to interact with photos in an album format that can be distracting. The old Photo Viewer app was more matter-of-fact and let you view a single photo at a time, quickly rotate it, zoom in or out, or move to the next photo with little fuss. If you preferred the old Photo Viewer app, it is actually still present in Windows 10 and can easily be accessed.

To enable using the old Photo Viewer you will need to copy and paste the following in a notepad file:

Windows Registry Editor Version 5.00

[HKEY_CLASSES_ROOT\Applications\photoviewer.dll]

[HKEY_CLASSES_ROOT\Applications\photoviewer.dll\shell]

[HKEY_CLASSES_ROOT\Applications\photoviewer.dll\shell\open]
"MuiVerb"="@photoviewer.dll,-3043"

[HKEY_CLASSES_ROOT\Applications\photoviewer.dll\shell\open\command]
@=hex(2):25,00,53,00,79,00,73,00,74,00,65,00,6d,00,52,00,6f,00,6f,00,74,00,25,\
00,5c,00,53,00,79,00,73,00,74,00,65,00,6d,00,33,00,32,00,5c,00,72,00,75,00,\
6e,00,64,00,6c,00,6c,00,33,00,32,00,2e,00,65,00,78,00,65,00,20,00,22,00,25,\
00,50,00,72,00,6f,00,67,00,72,00,61,00,6d,00,46,00,69,00,6c,00,65,00,73,00,\
25,00,5c,00,57,00,69,00,6e,00,64,00,6f,00,77,00,73,00,20,00,50,00,68,00,6f,\
00,74,00,6f,00,20,00,56,00,69,00,65,00,77,00,65,00,72,00,5c,00,50,00,68,00,\
6f,00,74,00,6f,00,56,00,69,00,65,00,77,00,65,00,72,00,2e,00,64,00,6c,00,6c,\
00,22,00,2c,00,20,00,49,00,6d,00,61,00,67,00,65,00,56,00,69,00,65,00,77,00,\
5f,00,46,00,75,00,6c,00,6c,00,73,00,63,00,72,00,65,00,65,00,6e,00,20,00,25,\
00,31,00,00,00

[HKEY_CLASSES_ROOT\Applications\photoviewer.dll\shell\open\DropTarget]
"Clsid"="{FFE2A43C-56B9-4bf5-9A79-CC6D4285608A}"

[HKEY_CLASSES_ROOT\Applications\photoviewer.dll\shell\print]

[HKEY_CLASSES_ROOT\Applications\photoviewer.dll\shell\print\command]
@=hex(2):25,00,53,00,79,00,73,00,74,00,65,00,6d,00,52,00,6f,00,6f,00,74,00,25,\
00,5c,00,53,00,79,00,73,00,74,00,65,00,6d,00,33,00,32,00,5c,00,72,00,75,00,\
6e,00,64,00,6c,00,6c,00,33,00,32,00,2e,00,65,00,78,00,65,00,20,00,22,00,25,\
00,50,00,72,00,6f,00,67,00,72,00,61,00,6d,00,46,00,69,00,6c,00,65,00,73,00,\
25,00,5c,00,57,00,69,00,6e,00,64,00,6f,00,77,00,73,00,20,00,50,00,68,00,6f,\
00,74,00,6f,00,20,00,56,00,69,00,65,00,77,00,65,00,72,00,5c,00,50,00,68,00,\
6f,00,74,00,6f,00,56,00,69,00,65,00,77,00,65,00,72,00,2e,00,64,00,6c,00,6c,\
00,22,00,2c,00,20,00,49,00,6d,00,61,00,67,00,65,00,56,00,69,00,65,00,77,00,\
5f,00,46,00,75,00,6c,00,6c,00,73,00,63,00,72,00,65,00,65,00,6e,00,20,00,25,\
00,31,00,00,00

[HKEY_CLASSES_ROOT\Applications\photoviewer.dll\shell\print\DropTarget]
"Clsid"="{60fd46de-f830-4894-a628-6fa81bc0190d}"

win10-photo-viewee

Then, save it with the file extension “.reg” to make it a registry file. Next, right-click the file you’ve created and select ‘Merge’ from the options.

win10-photo-viewer-option


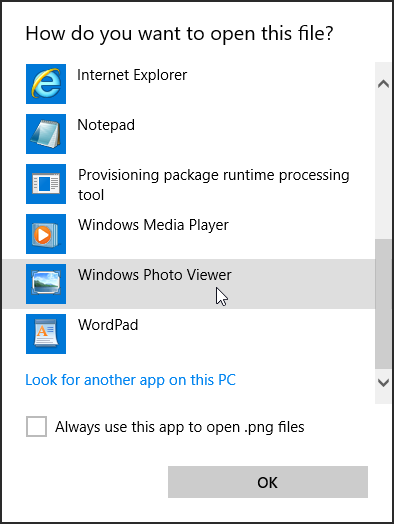
This will make the registry changes to allow you to use Photo Viewer again. Now if you right-click any image, you can select ‘Open With’ and then select ‘Windows Photo Viewer’ to open it with the old classic Photo Viewer app.

Windows-Photo-Viewer

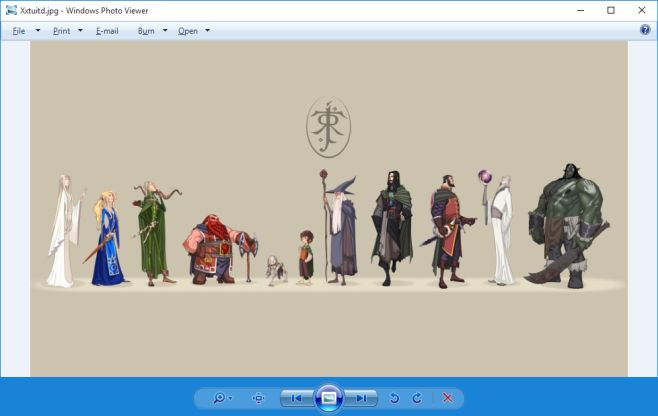
It looks and functions exactly as it did in your previous version of Windows and is a great alternative if you preferred the old interface.

Better Copy and Paste With These Android Apps

It doesn’t get much simpler than copying and pasting. It’s such a common and useful task that many people even know the keyboard shortcuts Ctrl + C for copying and Ctrl + V for pasting. You might think that would be the long and short of it but you would be mistaken. In fact copy and paste can be much more flexible than just taking a bit of text or data and copying it somewhere else. Unfortunately the stock Android copy and paste functionality is missing many of these more advanced features and that’s where apps step in. Give these apps a try to vastly improve the copy and paste capabilities of your Android device.

1. Native Clipboard

native-1

Native Clipboard is a souped up copy and paste app that can store a record of what you’ve copy and pasted for quick and repeated access. The interface is great and very easy to navigate and your copied snippets are easily visible and usable. It can also double as a note taking or memo app as you can categorize and color code what you’ve copied.


2. Clipper

clipper-1

Clipper is highly recommended for its clean, fast and intuitive interface. It copies, pastes, and keeps a record of your clips for convenience and speed. It also has a separate list for very frequently used clips which can mightily speed up entering things like longer URLs or e-mail addresses. The free version unfortunately has a rather obtrusive ad along the bottom and a 20 clip limit but these can be removed by purchasing the app for $1.99.


3. Copy Bubble

copy-1

Copy Bubble is unique in that it has a floating interface bubble. You simply copy clips and they are all added to your Copy Bubble which can then be used to paste those entries anywhere by tapping the bubble. It’s amazing if you are a highly frequent user of copy and paste but maybe a little much for more casual jobs.

4. AnyCopy

anycopy-1

AnyCopy features much more security than the other apps combined. It has a PIN option to lock the app, encryption of your notes and password protection can be enabled for individual folders. It’s also completely free and does a fantastic job with any copy and paste task.

5. EasyCopy

easy-copy-1

EasyCopy augments your existing Android copy and paste to make it much faster and easier to copy to other apps. Usually you’d need to copy something, then close the app you copied the data from, open the app you’d like to paste the data into, and then paste it. EasyCopy presents a shortcut menu of apps when you copy something. It’s essentially saving you a few taps to open the other app you need to paste into but those taps and seconds can add up. The menu of apps to paste into can be configured to match your most frequently used apps for even more convenience.

Windows 10, Product Keys, and Activation

If you recently upgraded from an earlier version of Windows to Windows 10, you might be wondering about your product key and how it is treated with the upgrade. There are some important differences if you upgraded with Microsoft’s free upgrade program from Windows 7/8/8.1 or if you upgraded from a retail or official version received as part of a program like MSDN. They are important differences but shouldn’t be of much concern to the average user.

If you received your free upgrade from Microsoft and upgraded from Windows 7/8/8.1 then your key is tied to your specific hardware. You will only have a generic key that cannot be used to install Windows on other machines. If you need to do a fresh Windows 10 install, you can do so with a bootable DVD or USB device with a Windows 10 ISO on it and then skip the step to enter your product key. The installation will continue and then Windows 10 will be activated once it connects to the internet and recognizes your hardware. If you do change your hardware and want to retain Windows 10, you’ll need to contact Microsoft to allow them to activate your system.

On the other hand, if you got your copy from MSDN (and similar programs) or purchased it as a retail version, you will have a unique product key that can be used to install Windows on various hardware and will not be tied to a single piece of hardware. You can save this key and use it for fresh installs, installation on other machines, and as a backup for your current system. If you do lose it, there is third party software that can find your product key so you can record it once more for future installs.

settings update-security

If you need to check your activation status, you can click the Windows button, Settings, Update & Security, then Activation where your status will be shown under the Activation entry.

Restore Deleted Data Files, Contacts and Calendars From iCloud

Apple’s iCloud is a marvelous feature for protecting and restoring your data. These include everything from regular files to contacts, calendars, and reminders and all of them can be both uploaded to Apple’s cloud and pulled back down in the event that they’re lost or deleted. With recent updates to iCloud, restoring data for each category is just a few clicks away under new options to ‘Restore Files’, ‘Restore Contacts’, and ‘Restore Calendars and Reminders’. You simply login with your account at iCloud.com, then click on your account and iCloud Settings where you can access the restore options.

iCloud-2

iCloud-3

With ‘Restore Files’ selected, you’ll be given a list of files that have been recently deleted from iCloud storage. Luckily these are still stored for a period of time and you can recover them if they were deleted accidentally or you decide you want them back. This option will notify you of how much time is remaining before the files are permanently removed and no longer recoverable. This is a great feature for those that worry about accidentally deleting files in the cloud and also for an extra layer of protection for your data.

iClould-Advanced

The restore options for both Contacts and Calendars & Reminders are a little bit different. If restored, these can potentially overwrite your existing Contacts or Calendars and Reminders which could obviously prove to be troublesome and interfere with your current data. You will also need to reshare this data if it was shared previously, scheduled events will be cancelled and rescheduled, and invitations will be reissued. This could also be a headache if you have many appointments or invitations and they all get sent out again or need to be manually reshared. Just be extra careful when managing restoration of these kinds of data and be aware that they could conflict with or overwrite your current Contacts, Calendars and Reminders.

Customize Windows 10 Themes and Colors

Going from Windows 7/8/8.1 to Windows 10 is a mostly painless experience and many are enjoying some of the new features present. You might have noticed immediately that much of the styling in actual windows is very bright and tends toward the lighter part of the spectrum. Opening a new Office document or File Explorer window can be a little jarring at first because of how bright and white the interface is. It’s more noticeable too with the absence of Aero and tinted upper portions of windows. If you find that these interface shifts are a little hard on your eyes, you can often adjust them to either be less bright or use an actual dark or gray theme to have the entire look shifted to darker colors. Here are a few common areas where the themes and colors can be adjusted and how to accomplish that.

1. Office 365

office-2 office-3 office-4

Inside Microsoft’s new Office 365, you can change the look by adjusting the ‘Office Theme’. Just click File, Account, then under Office Theme, you can select Light Gray or Dark Gray. Light Gray is still very bright and hardly makes a difference while Dark Gray does make the window a bit softer on the eyes by darkening most of the view.

2. Start Menu and Taskbar

taskbar-2 taskbar-3 taskbar-4 taskbar-5

Windows 10 and Windows 8 before it are pretty fond of that bright traffic light green as well as inky black. If you want to adjust these, it’s a simple matter of clicking the Windows button, Settings, Personalization, and then Colors. Disable ‘Automatically pick an accent color from my background’ and then select the darkest gray box for your new color. Also disable the next two entries so that the Start Menu icons and taskbar will also take on the dark gray color.

3. Edge Browser

edge-1 edge-2 edge-3

If you’ve become a fan of Microsoft’s new flagship browser, luckily it has a built in dark theme. Just click the three dots at the top right, then Settings, and under ‘Choose a theme’ select ‘Dark’ to have the entire interface changed to a much darker theme.

4. High-Contrast Mode

high-contrast-1 high-contrast-2 high-contrast-3

You can achieve something very similar to the Dark theme in Edge with High-Contrast modes in Windows 10. Click the Windows button, Settings, then Personalization, Themes, and finally Theme Settings. Then you can select from a few different High-Contrast modes which can turn the background entirely black with text and icons in white.

Give these settings a try if you want a darker theme in Windows 10. It’s great for use on a tablet or other mobile device at night or if you just prefer dark themes overall.