Check Your Battery Health With a Detailed Battery Report In Windows 10

While mobile devices like tablets and laptops are great for portable computing, they all suffer from the main drawback of relying on battery power. Batteries in turn lose their capacity and reliability with age and it’s always a good idea to check your battery’s health if your system is having issues. What many don’t know is that Windows provides a highly useful tool to monitor your battery’s behavior and health. In Windows 7, 8/8.1 and Windows 10, you can run a simple command to generate an extremely detailed report about your battery. Follow these steps to generate and view your own battery report.

1

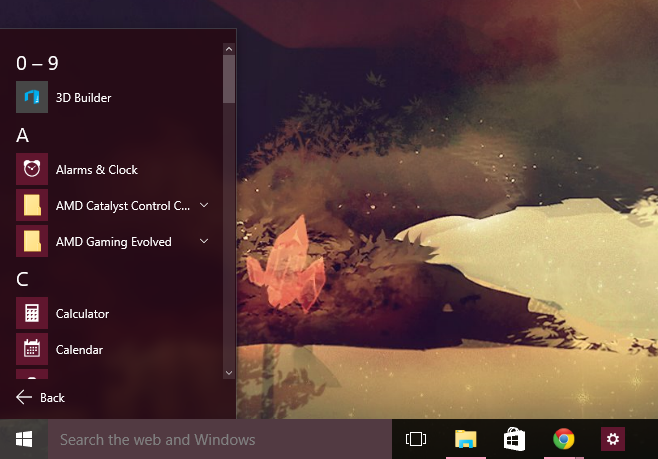
1. Right-click the Windows Start button on your taskbar. From the menu, select ‘Command Prompt (Admin)’.

2

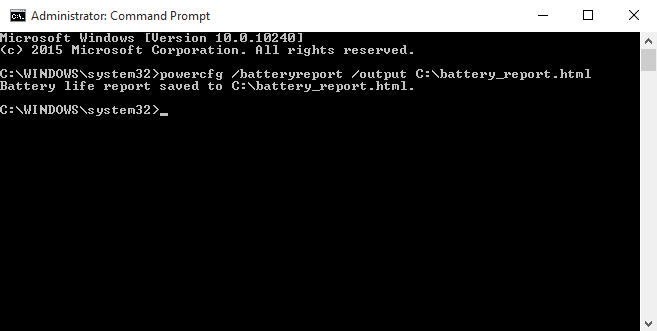
2. Inside the Command Prompt window, enter the following: powercfg /batteryreport /output C:\battery_report.html

You can change the output path after the quotation mark if you want to save the output file somewhere else. Otherwise it will be saved at the root of your C:\ drive.

3. Browse to your C:\ drive (or wherever you saved the output file) and you’ll find a file called ‘battery_report.html’. Use your favorite browser to open this file.

3

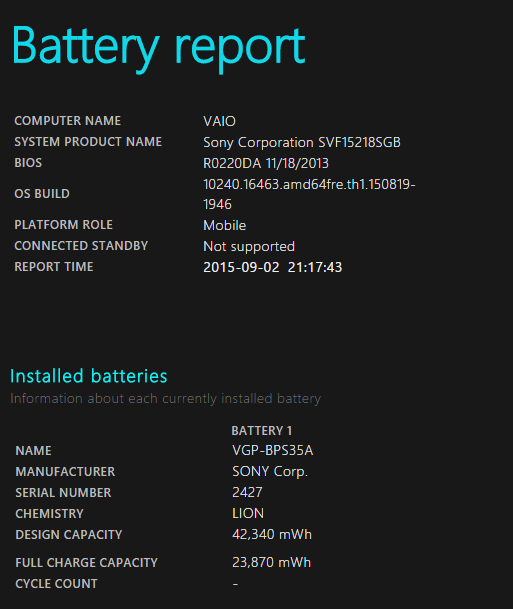
4. You’ll now be able to view your entire Battery Report which includes detailed data on the type and model of your battery, its design and current maximum capacity, as well as detailed usage statistics.

Inside the Battery Report, you can see the exact make and model of your battery which is useful if you’re wondering about a replacement or want to look up some information about it. You can also get an idea of how much the battery has aged by comparing its design and full charge capacities. If the battery is getting old, it’s likely that the full charge capacity will be noticeably lower than the design capacity. If it’s too low, you might consider getting a replacement battery. The detailed usage history lets you view when your battery was connected to an AC source and when it was running on its own. A graph showing the last 3 days of your battery’s charging and draining activity is also visible. You can even see battery life estimates and compare the estimates for both actual capacity versus design capacity. These are all great tools for monitoring battery health and behavior.

Easily Clone A Hard Drive With Macrium Reflect Free

There are several reasons you might want to clone a hard drive. You can create a full backup of any hard drive that can then be copied to a new hard drive for use with a new system. Cloning is also excellent for upgrading your existing hard drive to a higher capacity one without losing all of your files and settings. Of course cloning a drive is always a great backup measure as well in case something ever goes wrong with your system or you have very important files on it. Macrium Reflect Free is an elegant tool to accomplish hard drive cloning and is easy to use and highly reliable. Follow this procedure to use Macrium Reflect Free to seamlessly clone any hard drive to another one.

rescue-media

1. Before you begin, you will probably want to create a full backup of your existing hard drive that will be cloned. It’s also a good idea to have rescue media to fix any potential problems that can crop up. It just so happens both of these tasks can be performed in Macrium Reflect Free.

2. If you’re ready to begin, make sure you have the drive to be cloned, a secondary drive of equal or greater capacity where the cloned data will be stored, and Macrium Reflect Free downloaded and installed.

3. Now connect both drives to your computer. You will need enough power and SATA connectors to connect two drives at once.

4. Run Macrium Reflect Free and click the Disk Image tab to display all connected drives.

macrium-reflect

5. Select the drive you want to clone (copy over) to the new drive. Below it, click “Clone this disk…”.

6. Now click “Select a disk to clone to” and select the secondary drive that will hold the cloned data. Be careful to select the correct disk here as the secondary drive will have all data removed during the cloning process.

7. Adjust the partitioning on the secondary drive now. You can either make a single large partition of the entire drive or select part of it to hold the cloned data. If you want to use the whole disk just select “maximum size”.

8. The original drive will now be cloned to the secondary drive. Depending on how much data is being transferred, this could take some time so be patient.

9. When the process is done, connect the secondary drive to your system and attempt to boot from it. If the procedure worked, all of your data and system configuration from the original disk should appear on the secondary one as if it were the original.

Enjoy your cloned hard drive!

Set The Size Of The ‘Save As’ Window In Windows 7 And Up

We’re all familiar with the window that shows up when you’re saving a file. The window shows the location that the file will be saved to, lets you name it, and lets you specify the type of file being saved. One annoyance of the whole process is that the window is often set to some arbitrary size which is often too small. That makes it harder to navigate, see what’s already present in the folder, and even make sure you’re saving the file in the right place. In Windows 7 and up, there is a small trick that lets you set a default size of your choosing for the Save As window for each app. Follow this procedure to specify a windows size for the Save As window.

1. Open any app that can save files. This can be Microsoft Word, Photoshop, etc.

2. Then click Save As to open the Save As Window. You can also hit Ctrl+S to open the save window.

3. Resize the window so that at least one row of folders or files is visible in the window. You can also make it larger than this but not smaller.

save-as save-as-2

4. Hold the Ctrl key down while clicking the close button on the top right.

5. Now when you go to Save As from that app, the Save As window will remember the size you set and will appear with that size from then on. The window can also be resized and set with the same procedure.

Unfortunately this has to be done on an app to app basis so you can’t just set a universal Save As window size. As long as you remember to perform the process on your most used apps however, you’ll only need to do it once and the window size will be remembered for future uses. This is just another small trick that can potentially save a few seconds that add up to a lot over time.

Disable Automatic Driver Updates In Windows 10

By default, Windows 10 downloads and installs driver updates for devices automatically. While this is useful for many users who don’t want to manually update or constantly wonder whether their devices are using the latest drivers, for others it can become a major headache. Most people have experienced problems with device drivers at some time and it can be a mightily frustrating experience to uninstall/reinstall and search for appropriate drivers once something stops working. In some cases it’s best to adhere to that old advice of, “If it’s not broke, don’t fix it,” and just leave working drivers alone. In some cases, older drivers even work better depending on the system, OS, and other factors.

If you don’t want Windows 10 to automatically apply new device drivers, it’s quite easy to disable this feature. Just follow these steps to easily disable driver updates.

universaldriverupdate1

1. Search for ‘Control Panel’ in the search bar and open it.

systemproperties_0

2. Now navigate to ‘System and Security’, then ‘System’, and then ‘Advanced system settings’.

systempropertieshardwaretab_0

3. Next click the ‘Hardware’ tab, then click the ‘Device Installation Settings’ button below.

deviceinstallsettings

4. Now select ‘No, let me choose what to do.” You will be given two more options below.

5. If you want to completely disable automatic driver updates, select ‘Never install driver software from Windows Update’. If you want to continue letting Windows download and install driver updates, then you can click the top bubble, ‘Always install the best driver software from Windows Update’. On the bottom you can also toggle a box that allows Windows to download related apps and info for your device.

deviceinstallsettings2

6. Once you disable automatic updates, keep in mind that this disables driver updates globally for all devices on your system. In the future you will need to keep track of, search for and download any device driver updates if you need or want them. Unfortunately you can’t specify a single device or type of device that you don’t want updated.

That’s all there is to it. This is an easy way to ensure that your current drivers remain as they are and continue to work with your system. There are of course benefits at times to updating drivers for security and functionality so you’ll have to use your own discretion when it comes to updating.

Faster Navigate Of The All Apps List In The Windows 10 Start Menu

One noticeable change in upgrading to Windows 10 from previous versions is that now when you click the Windows button to open the Start Menu, you are given a list of only your most used apps. To access the full list, you’ll need to click ‘All apps’ which then opens a somewhat cumbersome alphabetical listing of every single app on your system. While it’s nice to have everything there in a list, it can grow very large if you have dozens or hundreds of apps installed and an alphabetical listing isn’t the most useful way to list apps as you might have to repeatedly scroll down to get to the app you want. The space available on the screen can also be an annoyance as the list only occupies a small portion of the side of the screen so icons can be small and scrolling takes longer.

win10-all-apps

There is however a helpful little tip that can potentially save you a few seconds every time you want to pull up a specific app using the Start Menu. First, click the Windows button to open the Start Menu and then click ‘All apps’ to bring up the familiar alphabetical listing of all available apps. Now, you might have noticed that each letter has its own section with the letters listed above all apps beginning with that letter. What you might not have known is that clicking each letter will bring up an alphabet menu that can be clicked as a shortcut to all entries under that letter.

win10-apps-letter

To use this shortcut menu, simply click the top ‘A’ letter to bring up the alphabet menu and then click the letter that corresponds to the first letter of the app you want to find and open. So you could click ‘A’ to open the alphabet menu, then click ‘S’ to jump to all apps that begin with ‘S’ if you’d like to open Skype. Letters that don’t have any corresponding apps will be greyed out and cannot be clicked so that also saves a little time and searching.

win10-apps-letters

Of course you could also just quickly type the app name in the search bar or add desktop shortcuts but this method is great for those with many apps and who frequently use the Start Menu.

Uninstall Or Delete Pre-Installed Windows 10 Apps

With the release of Windows 10, Microsoft has created a great number of new default apps which are integrated into the new OS. These apps come pre-installed and there is no convenient method to remove or uninstall them as you can with other apps. With a bit more digging and a few commands in Windows PowerShell however, you can indeed remove these apps included by Microsoft by deleting their Appx packages. Before you try these steps, check in the Settings app under System and then Apps & features and see if the app can be uninstalled directly. If it’s not one of the restricted default Microsoft apps, it can be removed with this method. If it’s not available to remove through Settings, then follow these steps to remove the app directly.

How-to-remove-pre-installed-Windows-10-apps

To remove pre-installed Microsoft apps that can’t be removed through Settings:

Launch-Windows-10-elevated-PowerShell

1. Type ‘powershell’ into the Windows search bar on the taskbar. The top entry will be ‘Windows PowerShell’. Right-click this entry and select ‘Run as administrator’.

View-AppX-Packages

2. Now you need to know the name of the Appx package you want to remove. Copy and paste this command into the PowerShell window: Get-AppxPackage | ft Name, PackageFullName -AutoSize. You’ll see a list of all apps and their names.

Remove-pre-installed-apps-in-Windows-10

3. Finally, enter the following command and change the text between the asterisks to match the app you want to remove: Get-AppxPackage *AppName* | Remove-AppxPackage. So to remove the Maps app for example the command would be Get-AppxPackage *windowsmaps* | Remove-AppxPackage.

For the most part, unless you truly hate a specific app or you just really want to clear up your system, there is little reason to remove these default Microsoft apps. You can easily download them again if you find that you miss them as well. If you really want to banish the app for good however, it’s easy to do so with PowerShell and a little bit of searching.