Force Cortana To Use Google Search With Chrome and Firefox

Cortana is Microsoft’s digital assistant and a big part of the new Windows 10. As expected, Cortana uses the Bing search engine and the new Edge browser for results wherever she is used. It’s not surprising that Microsoft would like to push their own search engine instead of using their competition in the form of Google search. Unfortunately, there is no default way to make Cortana use Google search though there is a simple workaround in the form of a browser extension named ‘bing2google’. This extension forwards all Bing search requests to Google and returns those results instead which effectively switches Bing searches to Google searches.

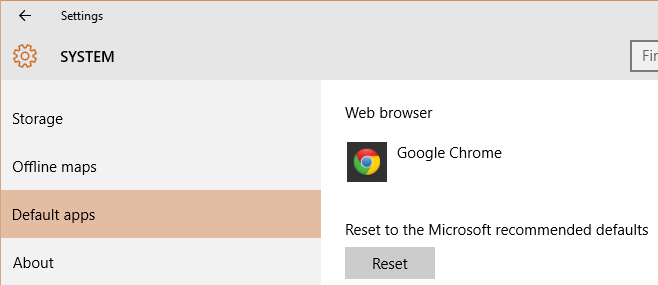
win10-def-browser

Cortana also uses the new Edge browser by default but this can luckily be switched to another browser such as Chrome or Firefox. To switch the default browser Cortana uses, simply go to the Settings app in Windows 10, then System, Default apps, scroll down to Web browser, and select the browser you’d like to use as your default. Now Cortana searches will be performed using that browser instead of Edge although the searches will still be made using the Bing search engine.

To force Cortana to use Google search instead, you’ll need to install the ‘bing2google’ extension in whatever browser you’re using. After installing it, there’s nothing else to do and Cortana’s searches will automatically be forwarded to and processed by Google as if they were Google searches. Results should now be returned in your browser of choice and using Google’s search engine. Poor Cortana will just be the messenger, the relay and have to tell Bing and Edge that they aren’t needed. Of course if you decide to switch, you can disable ‘bing2google’ and make Edge the default browser again and just wake them when you need them.

Install bing2google From The Chrome Web Store

Install bing2google Script For FIrefox

Enable GodMode in Windows 10

For the past three versions of Windows, a special way to access many administrator and system tasks has been hidden in a feature called ‘GodMode’. By accessing ‘GodMode’ you can perform many advanced tasks and have them all conveniently laid out all at once in a folder. Most if not all of these features can also be accessed via the Control Panel or Settings but with GodMode you can find them all in one place and it is especially helpful if you want to do a bunch of administrator tasks at the same time. Accessing GodMode is surprisingly easy, just follow these steps to gain omnipotence over your Windows domain.

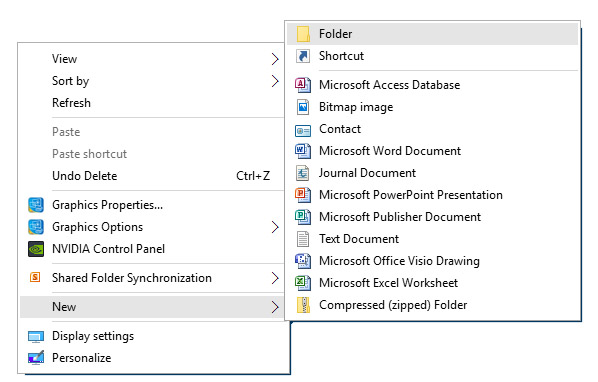
GodMode_Create_Folder

1. Right-click on the desktop and select ‘New’ then ‘Folder’.

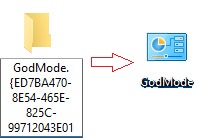
GodMode

2. Name the folder ‘GodMode.{ED7BA470-8E54-465E-825C-99712043E01C}‘, not including the apostrophes. Press Enter to create the folder.

3. The folder will now magically be named ‘GodMode’ and opening it will let you access numerous administrator options, settings, and tasks.

Inside GodMode you can do anything from managing disk space, Windows Defender, network settings, display options, etc. and access it all from one place. It’s definitely useful if you’re an admin, take care of the family computer or if you frequently switch settings for various thing inside Windows. It’s also just a fun all around tool and somewhat of a Microsoft Easter Egg.

It’s good to know that Microsoft chose to include it inside Windows 10 as well to speed up performing maintenance and administrative tasks. With the process being so simple, give it a try if you’ve ever wanted to speed up access to common system tasks. Note that you will need to be on an Administrator account to create and use GodMode.

Windows 10 and Wi-Fi Sense: Is It Safe?

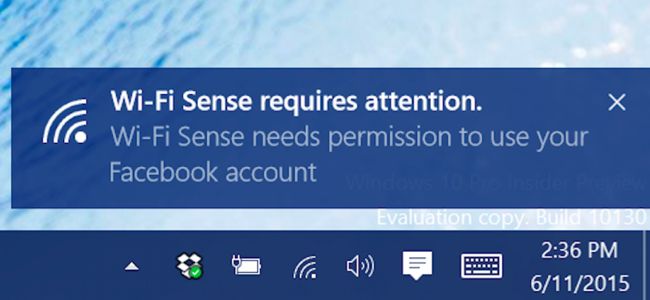
Windows 10 has a new feature called Wi-Fi Sense that allows you to share your local Wi-Fi internet access with people you know as well as access public, crowd-sourced hotspots. You can include Facebook and Skype contacts as well as anyone else you’d like to share your network with and they will then be able to connect to your WiFi without a password if they are in range. If you’ve ever had to share your password with friends or family when they visit, this feature is meant to streamline that process as well as let you keep your password without changing it or giving it away to others while still letting them use your network.

ximg_557b6883c56a1

Of course this sounds like quite a security headache at first glance. Wouldn’t this mean that some random Facebook acquaintance could wander over to your area, connect to your home network without a password, and then either hack your computer or view all your data? Thankfully that is not the case and Microsoft has designed Wi-Fi sense to reduce abuses like that. First, you must manually enable sharing on your home network for others to access it. Sharing is disabled by default so you won’t instantly get random contacts being able to connect to your network. You can turn it on and off as you like for when you have guests over or if you want to turn it off completely. Your WiFi networks can also be hidden by adding ‘_optout’ to the end of your SSID, the name of your network that is broadcast.

Also important is that Wi-Fi Sense does not enable file sharing or browsing of any kind, only internet access. So even if someone does connect to your network, they will not be able to steal files stored on your computer or browse through them.

If you’re concerned that Wi-Fi Sense gives your password away to everyone, that is also not the case. The password is uploaded, encrypted, and stored by Microsoft in the cloud so it is never retrievable or viewable in plaintext. It’s essentially invisible and used only by Wi-Fi Sense to make it easier for people to share networks without revealing their passwords.

All things considered, it’s up to you to decide if you want to use this feature. It’s been a part of certain business versions of Windows for some time now where sharing networks is common and useful. Like anything, it’s not entirely invulnerable to attack or abuse but on the other hand it is not as disastrously unsecured as some people think.

Fix The ‘Setup Couldn’t Start Properly’ Error When Upgrading to Windows 10

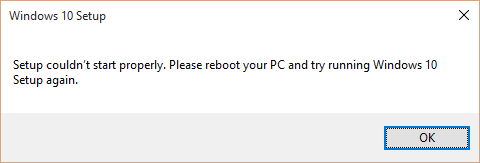
Some people have encountered an annoying error that reads ‘Setup Couldn’t Start Properly’ while trying to download the Windows 10 files with the Media Creation Tool. The next logical step would be to close the app and launch it again. However, this error will also prevent you from running the Media Creation Tool, as it pops up right after launching the app. Luckily it is very simple to fix this problem and hopefully complete the full download of your Windows 10 upgrade. Follow these steps to get the Media Creation Tool functional again so the download will go through.

media-creation-tool-error

1. Delete the Media Creation Tool. The file is very small and not tied to anything else so it is safe to remove completely.

2. Restart your computer.

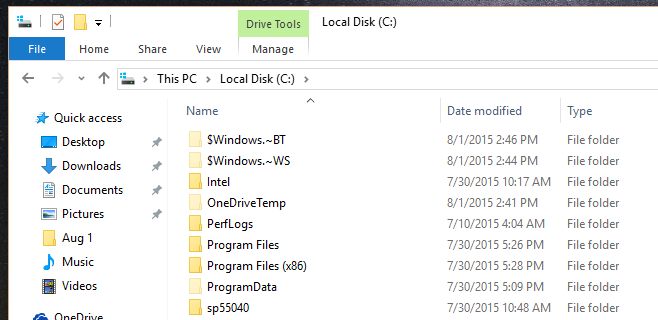
3. Open the C:\ drive and enable viewing hidden files and folders.

media-creation-tool-files

4. Find folders called ‘$Windows.~BT’ and ‘$Windows.~WS’ and delete them both.

5. Download and install the Media Creation Tool once more. It should now start without giving you the error and you will be able to attempt the download again.

Those folders you deleted held the previous update attempt files which apparently cause the error with the Media Creation Tool. With some luck, removing them and downloading the tool again should fix this error and allow you to try downloading the files again. This is just a small obstacle in the way of enjoying that new Windows 10 upgrade. Luckily this is among the easiest of errors to fix and also one of the quickest. If for some very unlucky reason your download is interrupted again, you can repeat this process to have yet another crack at it. You can also try to find a more stable internet connection to make sure it completes quickly and without the possibility of becoming corrupted.

Guide To Downgrading Windows 10 to Windows 8.1/7

The Windows 10 launch has been quite successful and the majority of users are very pleased with their free upgrades. There are some users who have encountered problems and understandably want to downgrade their system to a previous version of Windows. This can be due to incompatibilities with certain PCs and hardware, little bugs that have not been ironed out, or simply preferring an older version of Windows. If you do need or want to downgrade, thankfully Microsoft has provided the option and you can do so easily through Windows 10. It just takes a few clicks to restore your previous version, provided you didn’t manually remove it to free up some space. Follow this guide to restore your system to either Windows 8.1 or Windows 7.

settings-windows-10

1. In Windows 10, go to your Settings. You can launch it quickly with ‘Windows + I’.

windows-10-recovery

2. Now, click ‘Update & security’.

3. On the left under Recovery, you will be presented with an option called ‘Go back to Windows 8.1’ or ‘Go back to Windows 7’ depending on your previous version. Click the ‘Get started’ button below.

4. You can enter some feedback to tell Microsoft why you’re downgrading and then click ‘Next’ to continue.

5. Now proceed to follow the instructions onscreen and click through to allow Windows to revert to its previous version.

Once complete, you should be back to your older version of Windows as if you never upgraded in the first place. All your files and folders will remain intact and you can also choose to upgrade again if you like. Remember that you must do so within the 1 year period that Microsoft has allowed for free upgrades, otherwise you will need to pay.

This will hopefully resolve any issues that might have been present with Windows 10. You can always wait a little while and see if your compatibility issues or otherwise have been corrected and attempt the upgrade again. In the meantime, enjoy your trusty previous Windows version.

Recover Some Disk Space Following An Upgrade to Windows 10

After upgrading from a previous version of Windows to Windows 10, you’ll have a significant number of leftover files that take up space on your hard drive. These are left in place to make the upgrade faster and to allow for the possibility of downgrading back to the previous version of Windows. If you want to recover this space, you can delete these files and get the space back. Follow these easy steps to free up some space on your hard drive.

1. Important: Do NOT do this if you ever want to revert to your previous version of Windows as this will remove those files. If you like Windows 10 and everything is working, there is really no reason to keep these files so you can safely continue.

disk-cleanup-tool

2. Inside Windows 10, enter a search for ‘Disk Cleanup’, a built-in utility app and launch it.

disk-cleanup-for-windows-disk


3. In the Disk Cleanup window, on the bottom left is an Administrator button called ‘Clean up system files’. Click this button.

4. You’ll now be shown a list called ‘Files to delete’. You can select the entries called ‘Previous Windows installation(s)’ and ‘Temporary Windows installation files’. Then click ‘OK’.

5. The files will be removed and the space they were using will be made available again.

That’s all there is to it. The space you get back will vary slightly but should be quite a few gigabytes. If you have a very large drive, there is little harm in leaving the files there. By removing them, you do also remove any future ability to revert to a previous version of Windows. For the majority of users, this will never be needed and Windows 10 should suffice for many years to come. If you really want those extra gigabytes back or your hard disk space is limited, this can be a very useful tip to recover that space and have a cleaner Windows 10 installation.