File Explorer is one of the most commonly used features in Windows and lets you easily browse all of your folders, directories, files, etc. all with a few clicks. Everything is presented neatly in windows and that makes copying, moving, and other operations very simple to accomplish with a mouse. What many users don’t know is how much more File Explorer has to offer in terms of organizing your files. Of course you can view folders and files as simple icons and swap them about but this can get mightily confusing if you start to have hundreds of folders and never organize them or their contents.
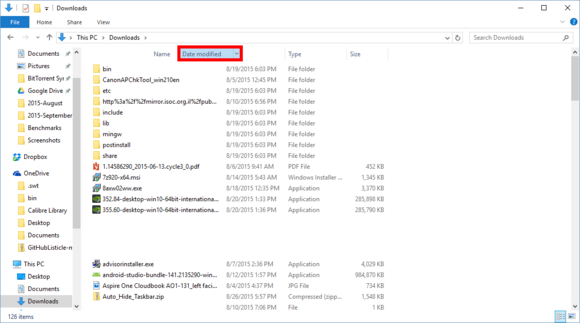
One of the best ways to quickly sort and organize folders is by using Views in File Explorer. Once you have a File Explorer window open and are in a folder or directory, you can click View near the top to change the way the folder is presented. You can show icons of varying size, tiles, a list, or perhaps the most useful of all, a Details view with even more control. After selecting a Details view, several tabs will appear that let you quickly sort the contents by Name, Date Created, Date Modified, Size, and file type among other options. This is a powerful organization and management feature and can save a ton of time and make it easy to unclutter a folder.
One extra trick you might not be aware of is that you can manually change the order of the details in the view. If you prefer to have the file’s size displayed before the date it was created for example, simply click and drag the ‘Size’ tab over to where you’d like it to be ordered. This will work for any of the categories so you can create any order of details in the view you want.
Even better, once you have a details ordering that you like, you can create a template and use this same view display for any other folder you want. Here are the steps to accomplish just that.
1. Find the folder with the details view that you’ve customized and want to apply to other folders, then right-click it and select Properties. Then click the Customize tab near the top of the menu.
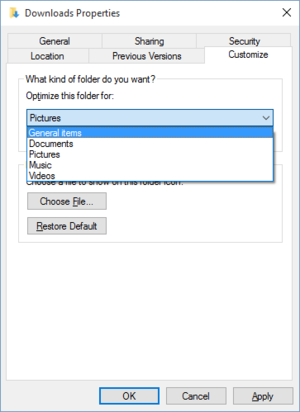
2. Under ‘Optimize this folder for:’ select ‘General items’. Check the box below that reads ‘Also apply this template to all subfolders’. Then click Apply and OK.
3. You will need to make sure that the details and view is set up the way you like it. Selecting ‘General items’ resets the ordering so you will need to recreate it now.
4. After your ordering is restored, click View, then Options on the right, then ‘Change folder and search options.’
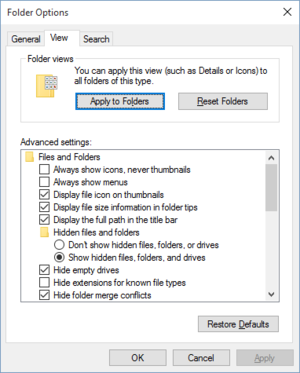
5. Now click the View tab in the window that appears, and then click ‘Apply to folders’ and finally click ‘Yes’ to confirm that you want to apply the changes.
6. To make other folders use this template, simply right-click them, go to Properties, then Customize, and then use the same ‘General items’ template.
7. To set the ordering back to the default for a folder, open it and click View, then Options on the right, then ‘Change folder and search options’. Then click the View tab, and finally click Reset Folders.